Editing in Photoshop
Prior Knowledge, and New Tricks
At the beginning of this school year I am beginning to learn more to photoshop than what I had left off with. Last year, coming in as a Freshman, I designed and sequenced a bouncing ball animation to get a few tools under my fingertips. Now, a year later, I am in Graphic Design, and learning more about how to apply the prior knowledge I had, and combining it with what we are learning to remove any unwanted scenes or objects from pictures. As we are given a series of video how-to's to watch, we use new tools and lean when, and how, to apply them. These tools range anywhere from the move tool and down to the clone stamp tool until we eventually combine all of the new information to create a portfolio (with preset pictures).
Content-Aware Fill
 |
| Originally had several marks and bolts |
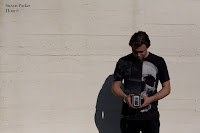
This can be activated through a few areas in the toolbar, such as the lasso tool, and when deleting an unwanted object like a bolt, or scratched paint, you can use content-aware fill. This takes parts around the spot you are deleting, and replaces the highlighted section with suitable aspects. However, this does not always go according to plan, and is sometimes off. For instance, deleting a graphic on a shirt replaced the graphic, with someones face that was near the highlighted section. This gadget allows for deleting graphics or objects in a picture quickly with little error.
 Patch and Clone Stamp
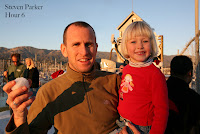
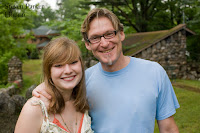
These tools clean up what the content-aware fill cannot. The patch tool selects an area, and then you are able to move the texture in that selected section, for one that better suits the image or piece of it. In contrast, the clone stamp tool selects a color or area of the picture, and can be brushed onto any part of the image. If you brush widely enough, you would be able to move an entire scene in the image, as long as your careful. these tools really make edited sections more natural when used properly. Take fo instance the pictures on the left. The upper picture had a graphic along the entirety of of his torso, but content-ware fill couldn't complete the job. So I used the patch tool to move select areas to have another texture, until it fit. Below that is the clone stamp tool in action, as there was a n entire crane and other machinery behind, and above, his head.
Healing Brush, and the Portfolio

When there is a speck, or spot that needs to be deleted, use the healing brush to quickly knock them off. When it is selected, you go in with a base color and then swipe over spots of dust and dirt, as simple as that. However, the portfolio was a challenge, but doable. I used all of the knowledge gained through the presentation of tools, and followed an instruction in a series of six videos. Then, taking three photos, I deleted, retouched, masked, and edited layers completely to make a solid looking portfolio. Then, using a different photo, reconstructed sleeves on the center photo, and added an overall gradient or hue to most of the portfolio itself.

 Patch and Clone Stamp
 These tools clean up what the content-aware fill cannot. The patch tool selects an area, and then you are able to move the texture in that selected section, for one that better suits the image or piece of it. In contrast, the clone stamp tool selects a color or area of the picture, and can be brushed onto any part of the image. If you brush widely enough, you would be able to move an entire scene in the image, as long as your careful. these tools really make edited sections more natural when used properly. Take fo instance the pictures on the left. The upper picture had a graphic along the entirety of of his torso, but content-ware fill couldn't complete the job. So I used the patch tool to move select areas to have another texture, until it fit. Below that is the clone stamp tool in action, as there was a n entire crane and other machinery behind, and above, his head.
  When there is a speck, or spot that needs to be deleted, use the healing brush to quickly knock them off. When it is selected, you go in with a base color and then swipe over spots of dust and dirt, as simple as that. However, the portfolio was a challenge, but doable. I used all of the knowledge gained through the presentation of tools, and followed an instruction in a series of six videos. Then, taking three photos, I deleted, retouched, masked, and edited layers completely to make a solid looking portfolio. Then, using a different photo, reconstructed sleeves on the center photo, and added an overall gradient or hue to most of the portfolio itself.


Comments
Post a Comment